

-
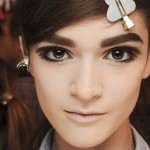
- Marc Jacobs S/S 2013
-

- Marc Jacobs S/S 2013
The sixties are making a comeback! This fun look is great for a girls night out, or even a date night! I’m sure you’re wondering how on earth you can accomplish this look. Well, last Halloween one of my costumes was Edie Sedgwick! I experimented for days on how to accomplish the perfect look! Here’s what it ended up being:
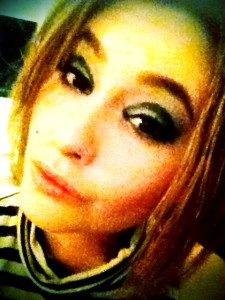
(Sorry the picture isn’t so good! Silly iPhone!)
The key to this look is the eyes! Don’t worry if you get it wrong the first go round, this is a harder look to master!
Now here’s how to do it:
Step 1: Apply your face makeup as you would any other day. The only note is to stay a way from any bronzer. If you want some face color, add a little bit of a light pink blush to your cheeks. The Pink Poppy blush stick by NYX would be a good fit for this look. Don’t go too overboard with it though!
Step 2: The eyebrows. It’s important to fully fill them in with this look. Most people use an eyebrow marker, I find it easier to fill them in with a tiny makeup brush and some eye shadow (I use Urban Decay, Smog).
Step 3: Here’s where the real look starts. First, apply a eyeshadow base. Since this look requires a lot of different products with your eyes, this will help keep everything you do in place all night (or day) long! I like to use the NYX Eye Shadow Base in White. Personally, I like how it helps start completely fresh but you can go with the Skin Tone one too! Either works!
Step 4: Next, you’re gonna sweep a silver eyeshadow over your lid from your lashline, to your brow bone with whatever eyeshadow brush is your favorite. A lot of people are super conscious about what brushes to use, but I’m no brush expert and I don’t pretend to be one. So use which ever brush you’re most comfortable with! NYX has the perfect silver shadow for this look!
Step 5: This is where the tricky part starts! The eye liner is the hardest with this look. If you look closely at the photos, the crease of the eyelid is black in all photos. I tried mastering this with just a shadow, but I found that using a black liquid liner in your crease works the best. I like to use a Rimmel liquid liner to do this. Start the line on your crease from the inner corner and work your way out. Go over it a couple times to really define it and then let it dry. Don’t rush the drying process, it’ll take a few minutes. Just relax. This was the hardest part for me, so don’t fret if you have to try it a couple times!
Step 6: Next, you’re going to sweep the same Rimmel liquid liner across your top lash line. When you get to the outside of lid, go down with the liner. Warning: do not wing the liner, it will completely change the look!
Step 7: Now you’re going to do your bottom eyeliner. This is pretty easy. Just line them how you normally would! I like to use a simple Covergirl liner in Midnight!
Step 8: You’re crease liner should be completely set by this point. From your crease line to your brow bone, blend the silver shadow you’ve already put on with some white shadow. This will soften the upper part of your eye and bring the look together. Make sure to really blend it in! For the white shadow, I used NYX White Shadow…it’s honestly the perfect white!
Step 9: Eyelashes. I love curling my eyelashes, so I do it every day! If you’re not comfortable with it, you can skip this part! You can also add some fake lashes if you want! I tend to stay away from fake lashes, but they would look divine with this look!
Step 10: Mascara! We’ve reached my favorite part! One thing I love to splurge on is my mascara. When you find the right one, you have to stick with it! I use Urban Decay Totally Loaded! I like to apply 2 or 3 coats of mascara, just to really make them stand out!!! After you do the top lashes, apply just a little to your bottom lashes! Not a lot, just a little to make them visible.
Step 11: To complete this look, use a soft nude lipstick. The important part of this it to not use anything too dramatic. I chose Revlon Super Lustrous Nude Attitude.
And that’s how to do this Sweet Sixties look! It may seem a little complicated, but once you get down, it becomes second nature!
Leave a comment below and tell me what YOU think of this look and what makeup look you’d like to see next! If you have any trouble accomplishing this look, feel free to ask for help in the comments as well!
Stay Beautiful!!!
J xo
PS- If you want to add something fun to this look, draw a little Marilyn mole!
14 comments for “DIY: Sweet Sixties Summer Beauty Look”